Thanks to all who attended our CoreBlox SiteMinder ToolBox Webinar! An archived recording of the event is provided below for your convenience. Please be on the lookout for more updates including documented responses to all the questions that were posed during the webinar. http://youtu.be/WC_90ZQuZ0A
↧
CoreBlox SiteMinder ToolBox Webinar
↧
We Are Hiring!

↧
↧
June 26th Webinar - Register Today!
↧
Innovation with Ping Identity
“Congratulations, you’ve been invited to the first annual PingCon where you’ll also have a chance to compete for the 2014 PingCup and get your offering in front of our customers.”
These were the words that arrived in my in-box back at the end of May. As a Ping Identity Platinum Services Partner, we look forward to these types of events as it gives us insight into Ping’s roadmap as well as a great opportunity to share our expertise with Ping’s customers we might not otherwise have.
We knew we weren’t going to miss PingCon, so that left one question, “What do we present for PingCup?”
While our CoreBlox Token Service (CTS) has received great reviews from both Ping Identity and CA Technology customers, (see, Webinar: How TIAA-CREF Successfully Connects On-Premises and Cloud Identity Technology), we wanted to come up with something that 1) No one else is doing and 2) Something that is simple, powerful and scalable.
With CoreBlox’s history and expertise in Identity and Access Management consulting, we’ve been very excited about Ping’s Federated Access Control product, PingAccess. PingAcces brings a standards-based approach (like all things Ping Identity does) to the SSO/Access Control space. With support for OpenID Connect (OIDC) for user Authentication as well as a Reverse Proxy and/or “Agent” based deployment option, it’s a powerful piece of technology. Ping has made it as simple to deploy and upgrade as their PingFederate product which means organizations of all sizes will find it an attractive entrant to the IAM space.
In the process of exploring PingAccess, we realized that for customers that choose to utilize both PingAccess and SiteMinder (or are migrating from one to the other), we had an opportunity to simplify the integration between the two by leveraging our CTS solution in the form of a custom Site Authenticator.
PingAccess Site Authenticator – Some Background
PingAccess has a feature called the “Site Authenticator”. Site Authenticator’s are used when PingAccess is deployed in “Gateway” mode (a.k.a. Reverse Proxy) and the web resources being protected by PingAccess have their own token/session requirements for authenticated users that must be kept in place.
PingAccess ships with the Token Mediator Site Authenticator, which allows PingAccess to leverage the Security Token Service (STS) built into PingFederate and exchange the PingAccess session token (called PA Token, which is a signed or encrypted JSON Web Token (JWT)) for the required back-end token type utilizing an available PingFederate Token Translator. For customers using the CoreBlox Token Service, PingAccess, PingFederate and CA SiteMinder, the token exchange looks something like this:
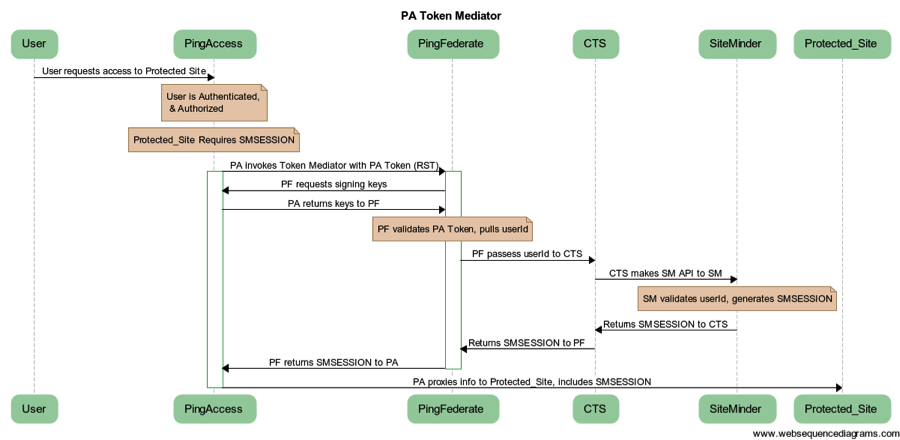
The notable piece here is that PingAccess calls PingFederate in order to utilize the CoreBlox Token Translator. The CoreBlox Token Translator is then calling CTS in order get the necessary SMSESSION information from SiteMinder. All this info is returned to the Token Mediator Site Authenticator which injects the SMSESSION cookie into the backend request without the user ever being prompted by SiteMinder to authenticate.
While this works today to give customers seamless SSO between PingAccess and SiteMinder, it does have some drawbacks:
- Limited to WAM systems where a PingFederate Token Translator exists
- Extra protocol translation from WS-Trust to JSON REST
- Extra traffic/hops that must pass through PingFederate
- Another service that needs to be configured, monitored and troubleshot
- Potentially new license file to enable STS in PingFederate that must be applied
We think there’s a simpler way to achieve the same thing: The PingAccess CTS Site Authenticator
PingAccess CTS Site Authenticator
We thought to ourselves, “What if there was a way to directly integrate PingAccess to the CoreBlox Token Service without having to pass through PingFederate?” This would eliminate issues #1-#5 listed above AND be simpler/quicker for customers to configure. So we went ahead and wrote the custom integration using the brand new PingAccess 3.0 SDK that Ping Identity just released at the Cloud Identity Summit and presented it to all the attendees at PingCon.
Now, when customers need to provide seamless access between PingAccess and SiteMinder, they can utilize our CTS Site Authenticator for PingAccess. With the custom Site Authenticator in place, the flow now looks like:

In the flow above, you’ll notice that PingFederate is no longer used as an intermediary to CTS. By using the CTS Site Authenticator PingAccess has the ability to interface directory with the CoreBlox Token Service.
This setup has the following benefits:
- Support for CA SiteMinder today via CTS. Additional WAM support is being planned.
- No protocol translation required. Simple JSON REST call from PingAccess to CTS
- Reduced traffic load on PingFederate
- 2 fewer configuration points. No need for Token Processor & Token Generator in PingFederate STS
- Uses the existing PingFederate license. No additional features required.
If you’d like to find out more about our CTS Site Authenticator and/or CoreBlox Token Service, email sales@coreblox.com or dial 1-877-TRY-BLOX.
Ian Barnett
Ping Identity Practice Director
↧
Announcing CoreBlox SiteMinder ToolBox 2.0!
CoreBlox Announces the General Availability of CA SiteMinder ToolBox 2.0 FRAMINGHAM, MA, September 8, 2014 – CoreBlox, a CA Global Partner Program Platinum Member, today announced the General Availability of the new version of its CA SiteMinder® add-on, the CoreBlox SiteMinder ToolBox 2.0. The previous version, CoreBlox SiteMinder ToolBox 1.0, was designed to automate many of the manual tasks that are required to maintain and optimize a CA SiteMinder deployment. Its core capabilities included policy migration, configuration settings optimization, and reporting. The 2.0 version introduces many exciting new features such as the addition of a Web-based user interface, users and groups to enable fine-grained administration, user and group specific artifacts for enhanced team collaboration capabilities, and the ability to detect and correct SiteMinder policy differences across environment tiers.
"ToolBox 1.0 was a great way for us to enter the SiteMinder add-on market and create value right away by attacking the pain points associated with policy migration," said Todd Clayton, President of CoreBlox. "We built up a solid user base and we carefully listened to their feedback on how to make our product even better by broadening its SiteMinder administration capabilities and simplifying the ability for organizations to provide shared access to to the tool. SiteMinder ToolBox 2.0 is our direct response to this feedback. We're proud that our ToolBox makes the most powerful web access management product in the world even more effective."
SiteMinder ToolBox 2.0 will be a free upgrade for those customers who purchased the previous version.
CoreBlox has been providing professional services around the CA Technologies security stack, including CA SiteMinder, since 2005. In 2012, CoreBlox became an official CA Developer partner. In 2013 the company was acquired by WinMill Software, a CA Preferred Services Partner and a premier provider of CA Clarity consulting services.
About CoreBlox
CoreBlox is a CA Platinum Services Partner and a leading provider of enterprise security services. Headquartered in Framingham, MA, the CoreBlox team specializes in single sign-on (SSO) and web access management solutions, SAML and identity federation services, and LDAP Directory Virtualization. CoreBlox has broad experience managing, executing and supporting Identity Management deployments. CoreBlox’ commitment to service excellence has won successful clients across the Fortune 500 and in a number of key verticals including Banking, Information Technology, Insurance, Telecommunications, and the Public Sector. For more information, please visit http://www.coreblox.com.
All trademarks, trade names, service marks, and logos referenced herein belong to their respective companies.
↧
↧
Webinar with Ping Identity
For those of you have may have missed it, Ping Identity has posted a recording of the webinar we did with Ping Identity and TIAA-CREF. In the webinar we discussed our CoreBlox Token Service and how we are enabling new business opportunities for Ping Identity and TIAA-CREF by extending CA SiteMinder (now CA Single Sign On). Here is the link to the webinar (free registration required):
↧
CoreBlox Announces the General Availability of ToolBox 2.1 for CA Single Sign-On
LAS VEGAS, NV, November 10, 2014 – CoreBlox, a CA Global Partner Program Platinum Member, today announced the General Availability of the new version of its CA Single Sign-On (previously known as CA SiteMinder®) add-on, ToolBox 2.1 for CA Single Sign-On. The first release of the product, ToolBox 1.0, was designed to automate many of the manual tasks that are required to maintain and optimize a CA Single Sign-On deployment. Its core capabilities included policy migration, configuration settings optimization, and reporting. The 2.0 version, launched in September 2014, introduced many exciting new features such as the addition of a Web-based user interface, users and groups to enable fine-grained administration, user and group specific artifacts for enhanced team collaboration capabilities, and the ability to detect and correct CA Single Sign-On policy differences across environment tiers. ToolBox 2.1 has added LDAP support, an enhanced diff tool UI for policy comparisons, and additional flexibility for object handling. “ToolBox 1.0 was a great way for us to enter the CA Single Sign-On add-on market and create value right away by attacking the pain points associated with policy migration,” said Todd Clayton, President of CoreBlox. “We built up a solid user base and we carefully listened to their feedback on how to make our product even better by broadening its CA Single Sign-On administration capabilities and simplifying the ability for organizations to provide shared access to to the tool. ToolBox 2.1 is our direct response to this feedback. We’re proud that our ToolBox makes the most powerful web access management product in the world even more effective.”
ToolBox 2.1 will be a free upgrade for those customers who purchased the previous version.
CoreBlox has been providing professional services around the CA Technologies security stack, including CA Single Sign-On and CA Identity Manager, since 2005. In 2012, CoreBlox became an official CA Developer partner. In 2013 the company was acquired by WinMill Software, a CA Preferred Services Partner and a premier provider of CA Clarity consulting services.
About CoreBlox
CoreBlox is a CA Platinum Services Partner and a leading provider of enterprise security services. Headquartered in Framingham, MA, the CoreBlox team specializes in single sign-on (SSO) and web access management solutions, SAML and identity federation services, and LDAP Directory Virtualization. CoreBlox has broad experience managing, executing and supporting Identity Management deployments. CoreBlox’ commitment to service excellence has won successful clients across the Fortune 500 and in a number of key verticals including Banking, Information Technology, Insurance, Telecommunications, and the Public Sector. For more information, please visit http://www.coreblox.com.
All trademarks, trade names, service marks, and logos referenced herein belong to their respective companies.
↧
IIS7 Application Pool Recycling and Idle Time-Out
 The smps.log can sometimes report sporadic errors indicating that it may have lost a connection to a server running a SiteMinder WebAgent:
[4280/5660][Wed Nov 05 2014 08:32:30][CServer.cpp:2283][ERROR][sm-Server-01090] Failed to receive request on session # 185 : <hostname>/<IP Address>:<Port>. Socket error 10053
If this error is occurring in the smps.log, you can check the webagent log of the server where the webagent is installed. This can be found by using the <hostname> reported in the smps.log error. The webagent log will have a correlating timestamp at or near the time of the Socket error reported in the smps.log.
NOTE: You should also keep in mind that the "Date Modified" timestamp of the webagent log can sometimes be different because once the webagent is stopped and restarted, a new log is only created once a request is made for a resource under the default website within IIS7. If this is an environment where the usage is low, there could be a different between when the error is reported in the smps.log on the policy server and when the webagent is restarted.
One way to confirm that the "Idle Time-Out" threshold is being reached in the DefaultAppPool in IIS7 is to check the Windows Event Viewer. You will also find that the System Log is reporting the following message:


Information about Event ID 5186 can be found at: http://technet.microsoft.com/en-us/library/cc735034(v=ws.10).aspx
Information about configuring Idle Time-out settings can be found at: http://technet.microsoft.com/en-us/library/cc771956(v=ws.10).aspx
By default, IIS7 sets application pools to “time-out” after 20 minutes of inactivity. If you do not have any activity to your site within 20 minutes the application pool will shut down – freeing up those system resources. By doing this, the webagent tied to the default application pool will also be shut down. Then the next time a request comes into the site IIS7 will automatically restart the application pool and serve up the requested pages and in turn, start the webagent. It will also mean that the first request – the one that causes the application pool to restart will be very slow. This is a result of the process starting, loading the required assemblies (like .NET) and finally loading the requested pages.
To extend the length of the time-out setting, simply change it from the default of 20 (minutes) to the value you choose. You can also adjust the setting to 0 (zero) which effectively disables the timeout so that the application pool will never shut down due to being idle.
To make this change, open Server Manager -> Expand the Roles -> Expand the Web Server (IIS) node. Then click on the Web Server (IIS) node -> Expand the node with your local server name and click on the Application Pools icon. You will then see a list of the application pools that are defined on your server. In the right-hand pane click the option for Advanced Settings. Source: http://bradkingsley.com/iis7-application-pool-idle-time-out-settings/
Restart IIS7 once the changes have been made. NOTE: When restarting IIS7, open Task Manager and make sure that the LLAWP.exe process fully terminates before starting IIS7.

After making the changes and IIS7 has been restarted, monitor the smps.log and the webagent logs to verify changes have taken effect.
↧
Add MS ActiveDirectory Authentication to PingFederate
A common scenario for many companies that are deploying PingFederate is the desire to authenticate user's against an existing LDAP-based user store (most commonly Active Directory). While this is something that PingFederate can easily handle, it does have several steps that might not be obvious to a novice PingFederate Administrator. In this post I'll walk everyone through a quick and *very* basic configuration. Specifically, there are three different pieces that need to be created/configured in PingFederate (preferably in this order):
- A new Data Store
- A new Password Credential Validator
- A new IDP Adapter
Step 1 - Create a new Data Store object
- Navigate to "Server Configuration | System Settings | Data Stores"
- Click on "Add New Data Store"
- Select Type "LDAP" and click "Next"
- Enter the hostname or IP of your existing LDAP server
- Choose "Active Directory" as the LDAP Type
- Enter the Bind Credentials (you can get these from your AD Administrator) and click "Next"
- PingFederate will test the connection with the information you have provided. If PF reports any errors, correct them and try again.
- If there are no errors, on the Summary screen chose, "Done" then "Save".
Step 2 - Create a new PCV object
- Navigate to "Server Configuration | Authentication | Password Credential Validators"
- Click on "Create New Instance"
- Assign your PCV an Instance Name and Instance Id
- Choose "LDAP Username Password Credential Validator" as the Type and click "Next"
- From the LDAP Datastore dropdown, select your Data Store created in the previous section
- Enter the Search Base (ie, "ou=users,dc=company,dc=com") for where PingFederate should start search for your user's
- Enter the Search Filter for how PF should identity unique users. For AD, this is typically "sAMAccountName=${username}" Note: For Sun/Oracle Directory Server the value is typically "uid=${username}" (where ${username} is the value the end user provides.
- Click "Next"
- On the Summary screen chose, "Done" then "Save".
Step 3- Create a new IDP Adapter
- Navigate to "IdP Configuration | Adapters"
- Click on "Create New Instance"
- Assign your PCV an Instance Name and Instance Id
- In the "Type" dropdown, for simplicity, choose "HTML Form IdP Adapter" and click "Next"
- On the following screen, you'll need to select "Add a new row to 'Credential Validators'". You can choose the PCV you created in the previous step and click "Update".
- Ping has already populated most of the options on this screen. For this example, you can use the defaults. If needed, you can come back and change these options at anytime.
- Click "Next"
- On the "Extended Contract" screen, choose "Next"
- On the "Adapter Attributes" screen, place a checkmark in the "Pseudonym" column for "username" and click "Next"
- On the Summary Screen click "Done" and then "Save"
That's it. Now you have an IdP Adapter that can perform a simple authentication against Active Directory. In order to use this Adapter, you'll need to add it to one of the Web SSO use cases that PingFederate supports (OpenID Connect, SAML 2.0, WS-Federation, SAML 1.1 or Adapter-2-Adapter Mapping) or use it for authentication to PingAccess resources.
Good luck! Ian Barnett Ping Identity Practice Director
↧
↧
AFCEA Homeland Security Conference

↧
Five Reasons For Federated Single Sign-On

↧
Password Managers & The Modern Web
 I read with great interest this Wired Magazine article regarding several well-known companies' web sites actually blocking the use of password manager programs:
This week a customer called out T-Mobile for blocking their password manager. WIRED confirmed on Thursday that it was not possible to paste text into the create password field on the T-Mobile site. T-Mobile got in touch on Sunday to say the problem had now been patched.1Jai Ferguson, a spokesman for T-Mobile, told WIRED earlier in the week that the company was “aware of the copy/paste issues and are actively working on a fix.” He added that the problem “certainly isn’t by design,” despite the HTML code used on the web-page explicitly prohibiting users from pasting into the password field.
Another customer complained that the German site for Barclaycard prevented pasting. Again, WIRED checked that this was the case. WIRED also confirmed that it was not possible to paste passwords in the registration section of the Western Union website.
The list goes on, and several people complained this month that PayPal was presenting a similar problem when users tried to change their password.
The article goes on to point out the dangerous assumption that preventing a compromised user's clipboard from being accessed is a panacea, since the user's keystrokes may prove to be just as susceptible to hacking.
Of course Password Managers themselves can have their own issues, as evidenced by the recent LastPass hack.
The initial Wired article concludes by suggesting that organization's should actively encourage and promote the use of password managers. What's your take? When it comes to consumer security, are password managers part of the solution or the problem?
↧
Stuck Installer Woes!!!
Installation woes….So have you ever been trying to install a CA product via the installer program only to watch it just sit there and hang to eternity, wondering what on earth is the installer doing? Well wonder no longer. CA products utilize the Install Anywhere application installer and because of this, you have a tool at your disposal to observe just what the installer is doing and possibly where it might be hanging on the install process. Personally, I just had to use this process to help resolve an installer issue with IDM 12.6sp6 installing to a WebLogic backend where the installer would just hang with no errors. After walking through this process I was able to determine that the installer was hanging after evaluating the JCE version and the installer determined the JCE was not correct, but the UI is not coded to return an error.

To observe the installer process, execute the installer file from the CMD line in windows. You will see a popup for the install anywhere process bar as it loads the installer application. When the installer gets near 100% complete, hold down the CTRL key on the keyboard and this will place the Install Anywhere application in debug mode and produce a popup that will show exactly what the installer is doing. I hope this process helps you along the road as you install CA products…
↧
↧
CA World 2015

Joins CoreBlox at CA World! Nov 17-20 at Mandalay Bay, Las Vegas
↧
WorkPoint Designer breaks after upgrading to IDM 12.6sp6 on Oracle WebLogic
 On the server that was upgraded, perform the following changes:
Step 1. Navigate to the following file and open it for editing: ~Program Files (x86)\CA\Identity Manager\IAM Suite\Identity Manager\tools\Workpoint\conf\workpoint-client.properties Confirm the following section exists, update the entry for the server you are on. # ************************************ # ******* ORACLE WEBLOGIC SETTINGS ****** # ************************************ # These properties should be uncommented when using the ORACLE WebLogic server. # The default Provider URL is local machine - change from localhost # to access an EJB server on a remote machine # java.naming.factory.initial=weblogic.jndi.WLInitialContextFactory java.naming.provider.url=t3://xxx.xxx.xxx.xxx:xxxx java.naming.security.principal=IDM java.naming.security.credentials=password
Step 2. Navigate to the following file and open it for editing: ~Oracle\Middleware\user_projects\domains\Domain\applications\iam_im.ear\config\workpoint-client.properties Confirm the following section exists, update the entry for the server you are on. # ************************************ # ******* BEA WEBLOGIC SETTINGS ****** # ************************************ # These properties should be uncommented when using the BEA WebLogic server. # The default Provider URL is local machine - change from localhost # to access an EJB server on a remote machine # java.naming.factory.initial=weblogic.jndi.WLInitialContextFactory java.naming.security.principal=IDM java.naming.security.credentials=password # ******* END SETTINGS ***************
Step 3. Copy the following files From ~Oracle\Middleware\wlserver_10.3\server\lib
wlthint3client.jar wlclient.jar
To ~Program Files (x86)\CA\Identity Manager\IAM Suite\Identity Manager\tools\Workpoint\lib
Step 4. Navigate to the following file and open it for editing: ~Program Files (x86)\CA\Identity Manager\IAM Suite\Identity Manager\tools\Workpoint\bin\init.bat Add the following
;..\lib\wlclient.jar;..\lib\wlthint3client.jar
To the end of the SET WP_JARS = line
Step 5. Restart the WL server instance.
Step 6. After the server is running, open CMD prompt as Administrator and navigate to the following path: ~Program Files (x86)\CA\Identity Manager\IAM Suite\Identity Manager\tools\Workpoint\bin>Designer.bat
↧
Quick Guide: Defining PingFederate Subcluster Servers [Updated - 11.29.15]
When setting up PingFederate in a highly-available architecture with a large number of nodes, it can be beneficial to add dedicated sub-cluster State Servers to manage session information across the cluster. A State Server is essentially a PF runtime node that does not handle normal SSO traffic, instead, it is dedicated to managing and centralizing specific federation session information for your deployment. While It’s not difficult to configure a State Server, you do need to have your logical infrastructure in mind to keep things straight. For example, let’s say you 4 runtimes across 2 data centers. Instead of having all 4 runtimes share session data directly, you'll want to setup a single State Server in each data center to minimize traffic that needs to traverse the data center connection. So in your first data center have 2 runtimes (rt1 and rt2) and you want to setup 1 state server (ss1). In your second data center, you'll have a mirror of the setup (rt3, rt4, ss2). The goal is to get rt1 and rt2 to direct session info/requests to the local state-server (ss1). Same for rt3 & rt4 w.r.t. ss2. Here's a simple diagram that shows the layout:

To set this up, do the following:
On <rt1>, you would edit your run.properties and set the cluster info as you normally do -
pf.cluster.node.index=1
pf.cluster.auth.pwd=<pwd>
pf.cluster.encrypt=false
pf.cluster.bind.address=<bind IP>
pf.cluster.bind.port=7600
pf.cluster.failure.detection.bind.port=7700
On <rt2>, you would do the same thing:
pf.cluster.node.index=2
pf.cluster.auth.pwd=<pwd>
pf.cluster.encrypt=false
pf.cluster.bind.address=<bind IP>
pf.cluster.bind.port=7600
pf.cluster.failure.detection.bind.port=7700
On <ss1>, you would do the same thing
pf.cluster.node.index=3
pf.cluster.auth.pwd=<pwd>
pf.cluster.encrypt=false
pf.cluster.bind.address=<bind IP>
pf.cluster.bind.port=7600
pf.cluster.failure.detection.bind.port=7700
Notice that each runtime has a unique pf.cluster.node.index. In your 2nd data center, you have a similar setup except that your runtimes would be pf...index=4, pf...index=5 and state server pf...index=6.
Up until now, you've followed the steps to configure a normal cluster where all 4 runtimes (and 2 state servers) are sharing all session data equally. Now, in order to direct your runtimes to share with a specific subset of servers, you'll need to modify the following file on each server in your cluster:
<install>/server/default/conf/cluster-inter-request-state.conf
For example, on <rt1>, you will need to set:
preferred.node.indices=1,3,6
This means that <rt1> will share state information with itself, <ss1> and <ss2>. If this field is left blank, all nodes will share state info with each other. Also, if you did not have the the local runtime index listed, then the runtime would have no state information stored locally and every state request would need to be sent to <ss1> and <ss2>.
On <rt2>, you will modify the file the same way and set:
preferred.node.indices=2,3,6
This instructs <rt2> to share with <ss3> and <ss6>. As you modify the files for <rt3>, <rt4> and <ss2> you end up with a information flow that looks like this:

Why specify certain node indexes?
When PF requests session information from the cluster, it automatically sends out a request to ALL the nodes listed in the preferred.node.indicies and will wait until it hears back from a majority of the members of the group. So if there are 3 servers listed, then the runtime will wait until it gets agreement from a majority of the nodes (2 of 3 in our case). So if a request is sent to <rt1>, there is a very highly likelihood that <rt1> and <ss1> will respond before the <ss2> and move on.
Load-Balancer Setup
The final step required is to ensure that your load-balancer directing traffic to the PingFederate runtimes is persisting user sessions to one data center or the other. This allows PingFederate to more efficiently manage sessions and minimizes the amount of cross-datacenter traffic required.
What about OAuth 2.0 or OpenID Connect?
Unfortunately, OAuth and OIDC tokens do not have the ability to utilize the State Server cluster capabilities inside of PingFederate (as of 8.0.3). In cases where communication between runtime nodes across data centers is not possible, a self-contained token (JWT) may be an option.
---------------------------- Ian Barnett Ping Identity Practice Director
↧
CA API Developer Portal: API Lifecycle Management
 APIs are increasingly important to companies. APIs can provide developers new ways to access company data. With CA API Developer Portal, developers can easily browse, discover, interact with APIs, develop application against APIs and eventually enable their company’s business.
However, the more APIs we publish, the harder it becomes for us to manage them. Also, with more developers using the portal, all kinds of applications could be developed against different APIs. It is essential for us to keep APIs healthy and up-to-date, otherwise, applications depending on those APIs can be broken.
It is essential to have an efficient way to manage the lifecycle of APIs.
API Lifecycle Management
Design API
All APIs start from design stage. API owners typically following this approach:
- Determine the purpose of API
- Design functions, operations, and methods, etc.
- Create a WADL file for REST API or a WSDL for SOAP API
- Create necessary instruction to help other developers understand this API.
Publish API on Gateway
In the CA API Management Suite, the CA API Gateway is the core engine. All APIs are actually hosted on the Gateway and it is what handles all the incoming and outgoing real-time traffic. Since all requests are centrally controlled on the gateway, we can apply security policies, etc. to secure the APIs on that gateway. Policy Manager can be used to develop policies on the gateway and configure the new API to be managed by CA API Developer Portal. API Key Management Fragment can be applied to the new API and then the API can be published on the gateway.

Publish API on Portal
Once the API is published on CA API Gateway, the API is actually working, but for developers, they need a way to discover this API and interact with it to learn how to use it in their own applications. The CA API Developer Portal is like the store-front of CA API Gateway. APIs hosted on Gateway are displayed on CA API Developer Portal. There is a run-time and design-time separation between the gateway and portal. The portal is for design-time while all run-time traffic is still going through the gateway.
So after the API is published on gateway, we need to enable it on portal so that developer can see it and build applications against. CA API Developer Portal has the ability to automatically create Interactive Documentation for REST APIs using a WADL file.

Develop Application Against APIs
Once the API is enabled on CA API Developer Portal, developers can log into the portal , discover the API from the API List, and interact with the API via the interactive documentation.
Once the developers have learned about this API, they can start building applications against it. You can log into the portal as a developer, create an Application, and select the target APIs.

Monitor APIs and Applications
Once Applications are developed against your company’s API, real-time traffic will start going through the API that is hosted on the gateway. A cron job allows CA API Gateway to constantly push Gateway Metrics to CA API Developer Portal so that the Developer Portal will be able to graph the usage of the APIs and applications.
Developers can use these functions to monitor their own applications. Administrators and API Owners can then monitor API usage and make decisions regarding the published APIs.

Design and Publish New Version of API
Based on the results from the analytics, API Owners can make the necessary modifications to the published APIs to fit the developers’ requirements. However, we cannot and also should not make modifications to APIs that have been used by applications, as it will cause errors. Instead, we should create a new version of the published API, publish it on gateway, then enable it on portal. Those are the steps for creating a new API.
Deprecate Old API Version
Once a new version of an API is available on the portal, you can deprecate the old version of the API. To deprecate an API means that no new applications are allowed to develop against this API, but applications already using this API can continue to use it. Developers will receive notices to encourage them to switch to the new version.

Delete Old API Version
Most developers would migrate their applications from the old version to the new version. The Portal Administrator has the ability to remove and send notices to certain persistent applications, who are still using the old version of the API.
When no application is using the old version of the API, the administrator can delete the API and this completes the entire lifecycle of this API.
↧
↧
Disabling Weak SSL/TLS Ciphers in CTS

When deploying the CoreBlox Token Service (CTS) in "Standalone" mode it may be necessary to disable weak SSL/TLS ciphers that are no longer considered safe. CTS utilizes embedded Jetty in standalone mode, which inherits the SSL cipher suites from the Oracle JVM (SunJSSEPRovider) that is installed on the system (You can find a complete list of ciphers available in the Java 8 documentation https://docs.oracle.com/javase/8/docs/technotes/guides/security/SunProviders.html#SunJSSEProvider)
While Oracle has deprecated a number of different ciphers, it may be required to add to that list in your CTS deployment. This can be done fairly easily by modifying the ../config/jetty.xml file.
Our default file configuration looks like the following -
<?xml version="1.0"?> <!DOCTYPE Configure PUBLIC "-//Mort Bay Consulting//DTD Configure//EN" "http://jetty.mortbay.org/configure.dtd"><Configure id="Server" class="org.mortbay.jetty.Server"> <Call name="addConnector"> <Arg> <New class="org.mortbay.jetty.nio.SelectChannelConnector"> <Set name="host"><SystemProperty name="jetty.host" /></Set> <Set name="port"><SystemProperty name="jetty.port" default="8585" /></Set> <Set name="maxIdleTime">30000</Set> </New> </Arg> </Call> <Call name="addConnector"> <Arg> <New class="org.mortbay.jetty.security.SslSocketConnector"> <Set name="Port">8586</Set> <Set name="maxIdleTime">30000</Set> <Set name="keystore"><SystemProperty name="jetty.home" default="./" />config/cts_server.keystore</Set> <Set name="password">SECRETPASSWORD</Set> <Set name="keyPassword">SECRETPASSWORD</Set> <Set name="needClientAuth">true</Set> <Set name="wantClientAuth">false</Set> </New> </Arg> </Call> <!-- required configuration --> <!-- connectors --> <!-- handlers --> <!-- webapps/contexts --> <!-- optional configuration --> <!-- threadpool --> <!-- session id manager --> <!-- authentication realms --> <!-- request logs --> <!-- extra server options --> </Configure>
Since we are utilizing Jetty 6.1, we can add a new setting called "ExcludeCipherSuites" which will then let us explicitly deny a list of ciphers we do not want to support. For example, here's a jetty.xml file that excludes a number of known, weak ciphers:
<?xml version="1.0"?> <!DOCTYPE Configure PUBLIC "-//Mort Bay Consulting//DTD Configure//EN" "http://jetty.mortbay.org/configure.dtd"><Configure id="Server" class="org.mortbay.jetty.Server"> <Call name="addConnector"> <Arg> <New class="org.mortbay.jetty.nio.SelectChannelConnector"> <Set name="host"><SystemProperty name="jetty.host" /></Set> <Set name="port"><SystemProperty name="jetty.port" default="8585" /></Set> <Set name="maxIdleTime">30000</Set> </New> </Arg> </Call> <Call name="addConnector"> <Arg> <New class="org.mortbay.jetty.security.SslSocketConnector"> <Set name="Port">8586</Set> <Set name="maxIdleTime">30000</Set> <Set name="keystore"><SystemProperty name="jetty.home" default="./" />config/cts_server.keystore</Set> <Set name="password">SECRETPASSWORD</Set> <Set name="keyPassword">SECRETPASSWORD</Set> <Set name="needClientAuth">true</Set> <Set name="wantClientAuth">false</Set> <Set name="ExcludeCipherSuites"> <Array type="String"> <Item>SSL_RSA_WITH_DES_CBC_SHA</Item> <Item>SSL_DHE_RSA_WITH_DES_CBC_SHA</Item> <Item>SSL_DHE_DSS_WITH_DES_CBC_SHA</Item> <Item>SSL_RSA_EXPORT_WITH_RC4_40_MD5</Item> <Item>SSL_RSA_EXPORT_WITH_DES40_CBC_SHA</Item> <Item>SSL_DHE_RSA_EXPORT_WITH_DES40_CBC_SHA</Item> <Item>SSL_DHE_DSS_EXPORT_WITH_DES40_CBC_SHA</Item> <Item>SSL_RSA_WITH_NULL_MD5</Item> <Item>SSL_RSA_WITH_NULL_SHA</Item> <Item>SSL_DH_anon_WITH_RC4_128_MD5</Item> <Item>TLS_DH_anon_WITH_AES_128_CBC_SHA</Item> <Item>TLS_DH_anon_WITH_AES_256_CBC_SHA</Item> <Item>SSL_DH_anon_WITH_3DES_EDE_CBC_SHA</Item> <Item>SSL_DH_anon_WITH_DES_CBC_SHA</Item> <Item>SSL_DH_anon_EXPORT_WITH_RC4_40_MD5</Item> <Item>SSL_DH_anon_EXPORT_WITH_DES40_CBC_SHA</Item> <Item>TLS_KRB5_WITH_RC4_128_SHA</Item> <Item>TLS_KRB5_WITH_RC4_128_MD5</Item> <Item>TLS_KRB5_WITH_3DES_EDE_CBC_SHA</Item> <Item>TLS_KRB5_WITH_3DES_EDE_CBC_MD5</Item> <Item>TLS_KRB5_WITH_DES_CBC_SHA</Item> <Item>TLS_KRB5_WITH_DES_CBC_MD5</Item> <Item>TLS_KRB5_EXPORT_WITH_RC4_40_SHA</Item> <Item>TLS_KRB5_EXPORT_WITH_RC4_40_MD5</Item> <Item>TLS_KRB5_EXPORT_WITH_DES_CBC_40_SHA</Item> <Item>TLS_KRB5_EXPORT_WITH_DES_CBC_40_MD5</Item> <Item>SSL_RSA_WITH_RC4_128_MD5</Item> <Item>SSL_RSA_WITH_RC4_128_SHA</Item> </Array> </Set> </New> </Arg> </Call> <!-- required configuration --> <!-- connectors --> <!-- handlers --> <!-- webapps/contexts --> <!-- optional configuration --> <!-- threadpool --> <!-- session id manager --> <!-- authentication realms --> <!-- request logs --> <!-- extra server options --> </Configure>
You can modify this list as you wish to remove ciphers as necessary. However, we feel this is a good starting point for most deployments.
Ian Barnett
Ping Identity Practice Director
↧
PingFederate 8.0 --#x3E; 8.1.x & CoreBlox Token Service
Many of our customers choose to deploy CTS from within their PingFederate server (this is a jointly supported deployment model by Ping Identity and Coreblox) instead of inside a 3rd Party Application Server or in standalone mode (using embedded Jetty). Customers who deployed CTS within PingFederate (who were using PingFederate 8) started to report issues accessing the PingFederate Admin API as well as deadlock issues with logging.
After some investigation, Ping Engineering is recommending making a minor change to the following file -- <PF_HOME>\pingfederate\modules\pf.mod -- to resolve both issues.
Specifically, in the [lib] section, the second and third lines need to be reversed so that your file looks like this (color added for emphasis):
#
# Jetty PF Module
#
[lib]
lib/**
server/default/lib/*
server/default/deploy/*
server/default/conf/

[xml]
etc/jetty-runtime.xml
etc/jetty-admin.xml
This file MUST be modified on all PingFederate instances and the server node restarted for the change to take effect.
NOTE: Ping Engineering has done some initial qualification of this workaround, but more is still pending with their integration kits to see if they're impacted by this change. There's a chance that some of the older kits (like the Salesforce IK) could be affected. As always, testing in a DEV environment is strongly recommended before going into production. Please report any issues immediately to Ping Support
Ian Barnett Ping Identity Practice Director
↧
Hacking CA SSO (SiteMinder) Password Services Redirects

CA SSO Password Service redirects work great if you want to use the default forms that ship with the Web Agent. While modifying the "fcc's" is a potential option, how do you take advantage of your existing password change forms? What about ignoring those pesky Active Directory password redirects? Let's get hacking. There are a couple of settings you can use with Password Services beyond configuring a Password Policy within the Admin UI. The settings must be obvious, right? Well... Keep reading for the scoop.
Hack 1: Changing the Password Services Redirect When no Password Policy is defined, CA SSO redirects to the default Password Services FCC URL. You can override this behavior by setting the NETE_PWSERVICES_REDIRECT environment variable to the relative URL where you want to redirect the user. While the documentation says the path must be relative, I have successfully set it to a fully qualified redirect URL. Give that a shot, but the official means of setting a full qualified URL is in the Password Policy itself.
 Password Policy Image
Keep in mind that the environment variable is set on the Policy Server(s) and not the Web Agent server(s).
Bonus: Take a look at the path in the Password Policy. If you ever wanted to exclude users based upon a LDAP attribute, you can use a search expression instead of a specific branch.
Hack 2: Disabling Password Services Redirects By default, CA SSO redirects natively disabled Active Directory users to Password Services, even if Password Services is not enabled for the authentication scheme protecting the resource or a Password Policy is not defined. To disable this behavior, set the IgnoreDefaultRedirectOnADnativeDisabled registry entry on the Policy Server(s). Configure the following registry entry:
Name
: IgnoreDefaultRedirectOnADnativeDisabled
Location
: HKEY_LOCAL_MACHINE/SOFTWARE/Wow6432Node/Netegrity/Siteminder/CurrentVersion/Ds/LDAPProvider
Type
: DWORD (32-bit) Value
Values
: 0 (disabled) or 1 (enabled).
Default
: 0. If the registry key is disabled, the default behavior is in effect.
 Registry Entry Image
Have Fun Storming the Castle and let us know if you have any other Password Services tricks.
↧